- Purpose
- Creating Account in-house
- Adding Account in-house to a chart
- Editing Account in-house
- Changing Account in-house's location
- Deleting Account in-house
- Questions
Purpose
If you want to work with data that is not available in Macrobond, there are two solutions for doing so, Account in-house and Excel in-house. Account in-house is the recommended solution as it needs no preparations on your side. Saving your in-house series to Macrobond servers allows you to easily share these series, and the documents they are used in, with your colleagues.
Creating Account in-house
You can either upload series directly from within the application, or by creating a template in Excel.
Account in-house codes depend on which account in-house series was saved:
| ih:mb:priv: | Personal account that can only be accessed by you. |
| ih:mb:dept: | Department account that can be access by everyone in the same department as you. |
| ih:mb:com: | Company account that can be access by everyone within the company. |
From application
Open the My series tab, which you’ll find in a list of additional activities. Select Account in-house from the drop-down menu and then click on 'New series' to open the dialog box. You can either input the data manually or copy and paste values from your file.
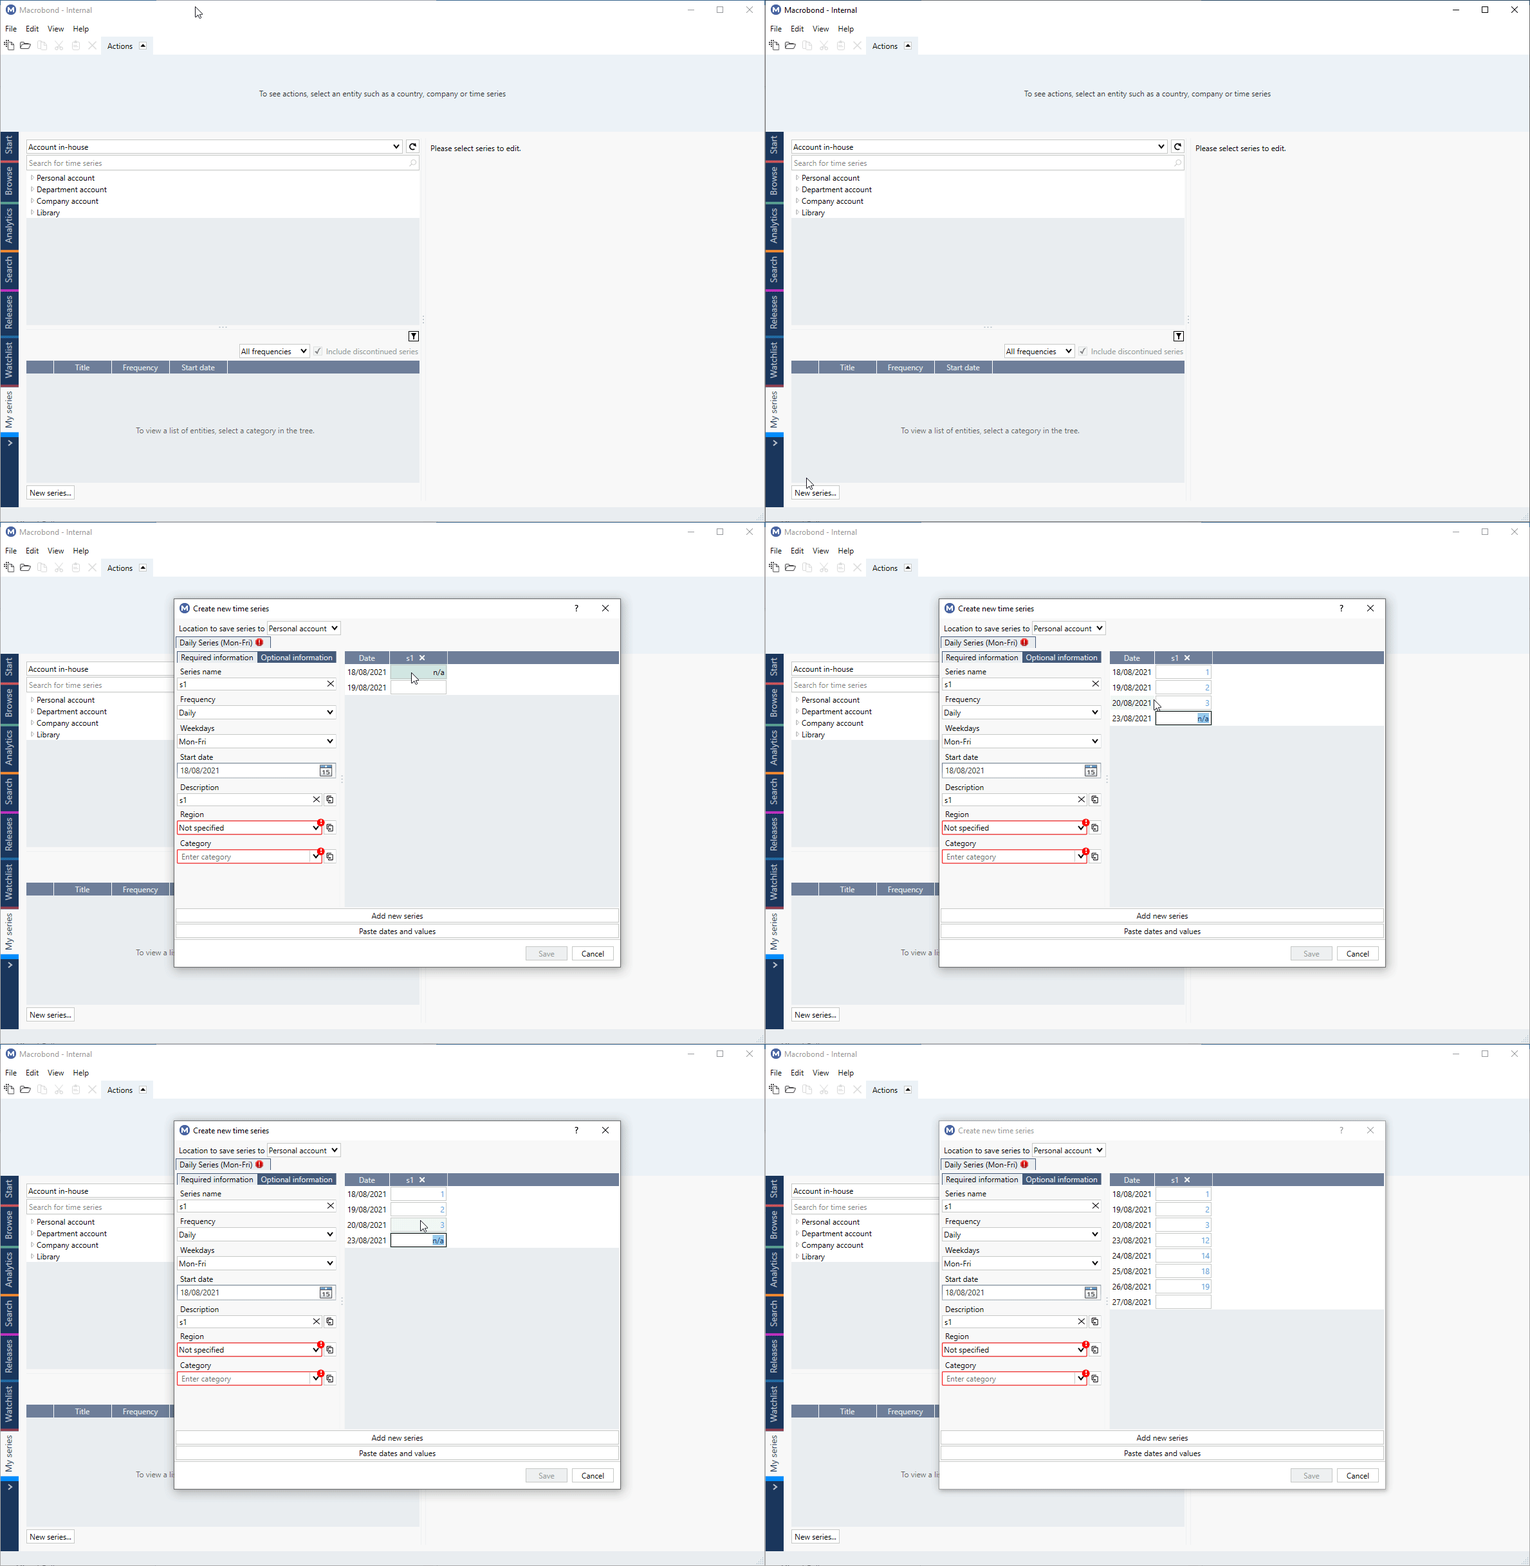
You can also modify the values. For example, if you want to add a forecast type the letter F in parentheses, followed by a space and then the value. If you don’t want to add a value for certain dates, type the word ‘Skip’.
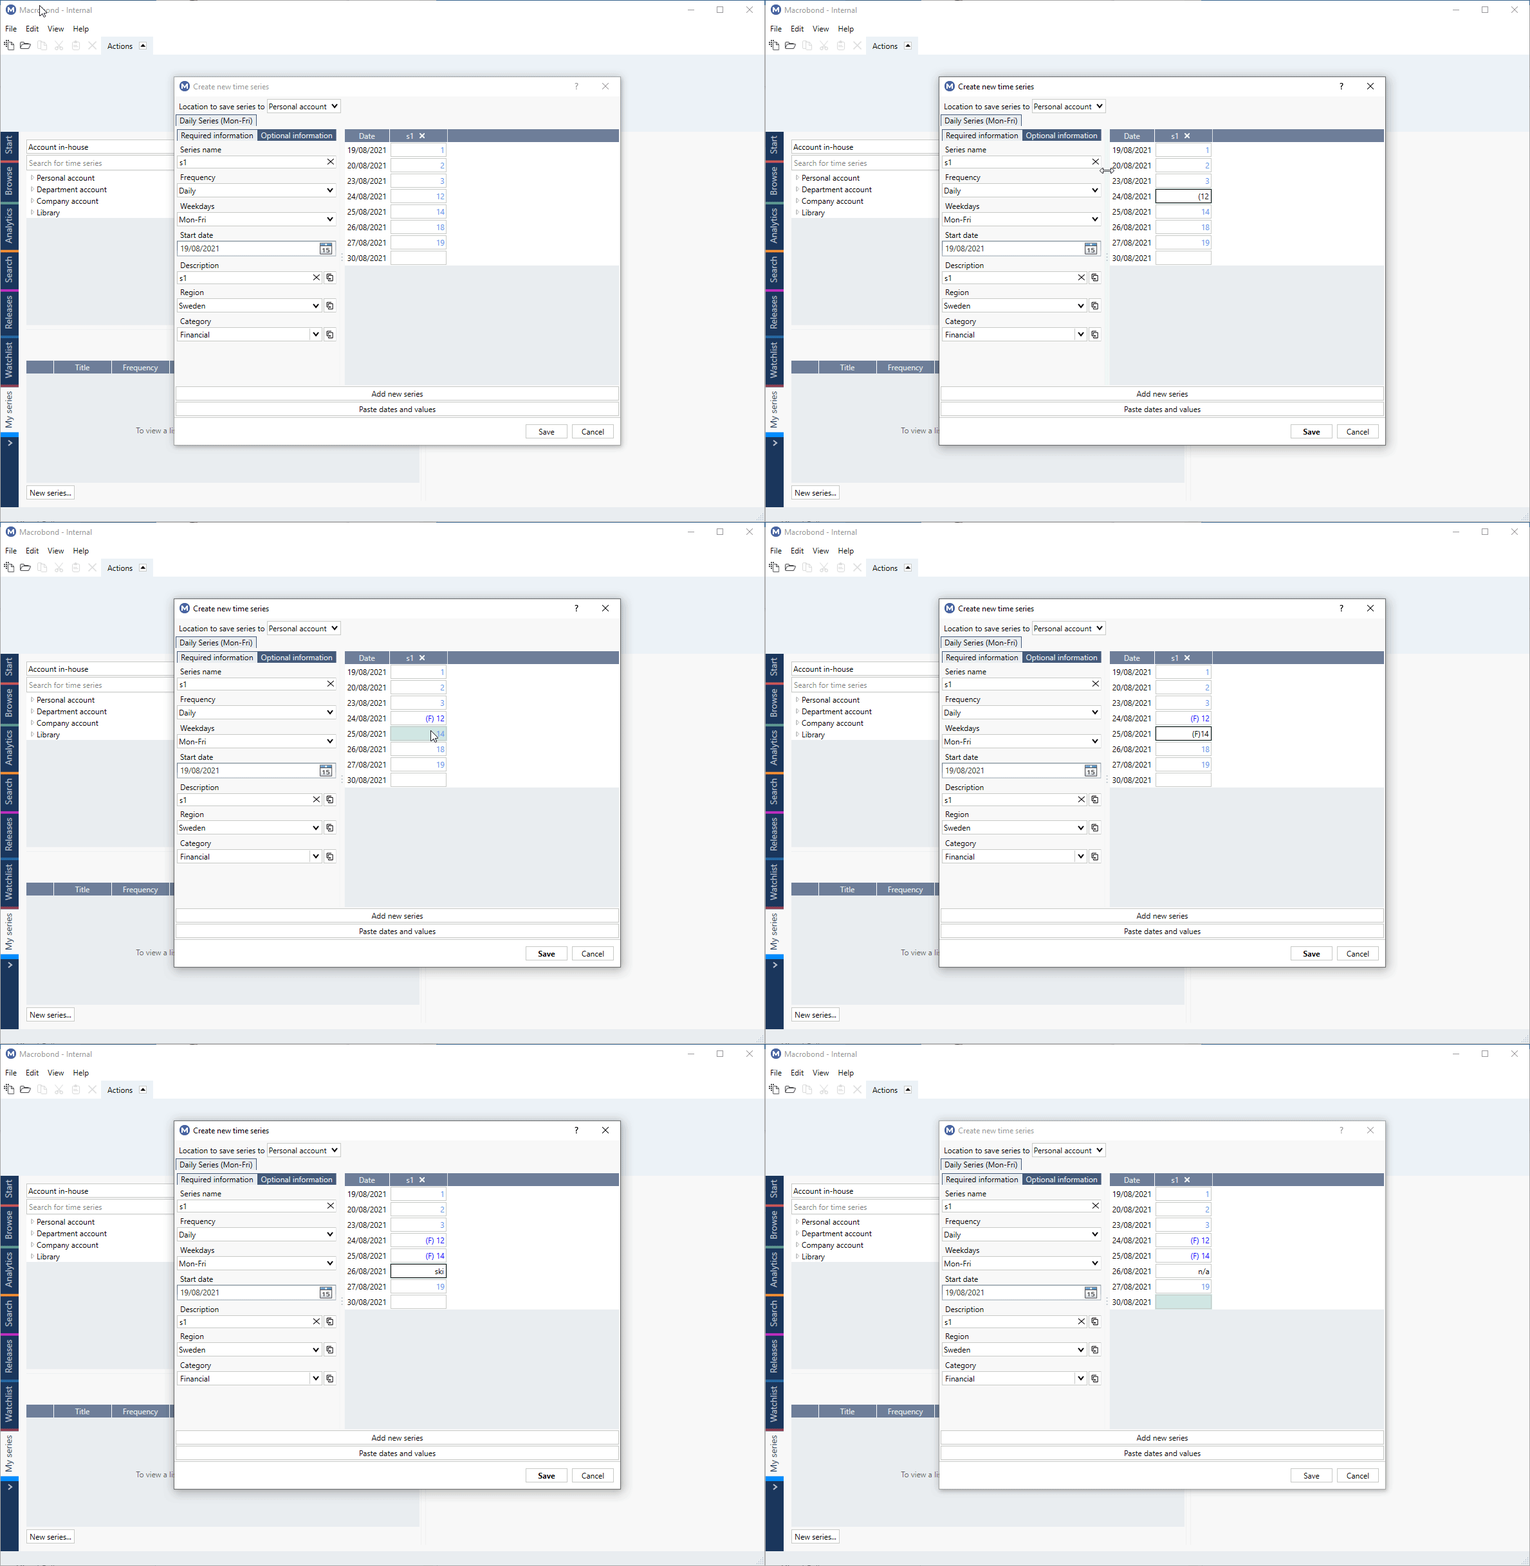
The next step is to fill in the basic, required information for the series:
- Location - to which account series should be saved
- Series name - unique code used to find series in the application
- Description - title of the time series
- Frequency, Start date, Region and Category
- Optional information - if you’d like to classify the series further
Once you’re done click on Save to upload the series to Macrobond.
Multiple series
To create more than one series simply click on the 'Add new series.' They can have different frequencies, but they must be added on same account.
From Excel
You can also upload Account in-house via Excel. The first step is to create the template. Click on the Macrobond tab in Excel and select 'Create template'. Note, template must starts in the first row.
Then add the required information for the series:
- Location - on which account series should be saved
- Series name - unique code used to find series in the application
- Description - title of the time series
- Frequency, Start date, Region and Category
- Optional information - if you’d like to classify the series further
If you want to add forecast values to the series, click on the Optional Information tab and tick box 'Add a column that indicates if a value is a forecast'. Once all the information is filled in, click on Create.
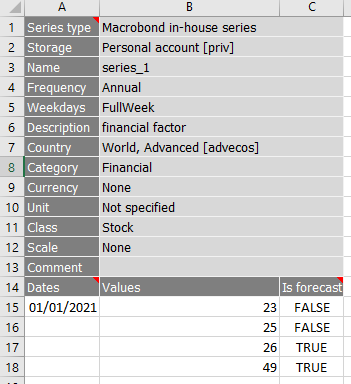
The next step is to add data to the relevant columns below the template. To indicate whether a value is a forecast or not, type either TRUE or FALSE in the forecast column. You only need to input the first date. Note that date format must be recognized as date by Excel.
Elements of template
- No other types are allowed.
- Available storages: Personal account, Department account, Company account.
- Name must have from 2 to 24 characters, no spaces. It should start from a letter and has only lower-cases and numbers.
- Available frequencies: Daily, Weekly, Bimonthly Monthly, Quarterly, Quadmonthly, Semiannual, Annual.
- Available weekdays: MondayToFriday, FullWeek, SaturdayToThursday, SaturdayToWednesday, SundayToThursday, MondayToThursdayAndSaturday.
- Besides countries it contains predefined regions (you cannot add new ones).
- Category can be anything.
Description, Currency, Unit, Class, Scale and Comment are optional.
Forecast column must be activated when creating, it cannot be added later.
Multiple templates
If you need to upload several different series, you can quickly create additional templates by copying the original and modifying the information. If both series have the same start date, simply copy the second column of the template, and make the necessary changes.

Uploading templates
If you’re working in an Excel file with multiple data sets and you’re ready to upload, you can choose to click and select specific templates and only upload those, or you can upload all of them at once.
After uploading template, refresh the data-tree in main-app to see this series.
Adding Account in-house to a chart
To access in-house series, go to Analytics or Browse tab and select the Account in-house database from the drop-down menu. Remember to refresh the data tree to show the series you’ve just added.
To add it to a chart, double-click on it or use red ' + ' sign.
Sharing Account in-house
Please add/copy your account in-house series to your Department or Company account to share it with your colleagues.
You can also embed it in a file with Document properties functionality. Note they won't be able to update that series.
Editing Account in-house
To edit the settings of a series, go to the My series tab, select account, and navigate to the series.
You can also find it from Analytics or Browse tab. In such case you need to navigate to series and in Actions ribbon select My series > Go to in-house series.
Click on the Edit button to access the series information.
You can change any of the fields, except the Series name, and change/add values. To complete the task, click Save.
Changing Account in-house's location
To move or copy a series into a different folder, click on 'Move or copy to other account...' button
or right click to select the option from the context menu.
In the dialog box, choose a new directory. Now, you’ll need to decide if you want to create a copy in this location, or simply to move the original to the new directory.
Deleting Account in-house
There are two ways how you can delete an in-house series:
- Go to My series tab, find the series, right-click on it in bottom panel and select 'Delete'.
- Mark it on Series list, go to Actions ribbon > My series and press 'Delete in-house series'
Questions
- Can i download in-house series through other API (i.e., Python)?
- How do I upload a time series, that starts before 1900, to Excel?
- Why do I see [something] in a template?
- Why do I see ‘Region mismatch’?
Can i download in-house series through other Macrobond API (i.e., Python)?
Yes, you can download account in-house series and calculated in-house series in other APIs. You can also download series wrapped in our Ratios.
It's not possible to download series wrapped in formulas.
How do I upload a time series, that starts before 1900, to Excel?
Macrobond supports the time series with dates starting before 1900, while Excel, unfortunately, does not. Note the earliest year available is 1000. Macrobond add-in automatically recognizes dates which are entered as text strings. To construct them use the =CONCATENATE formula in Excel.
Set aside one column, and type in the start date’s year.
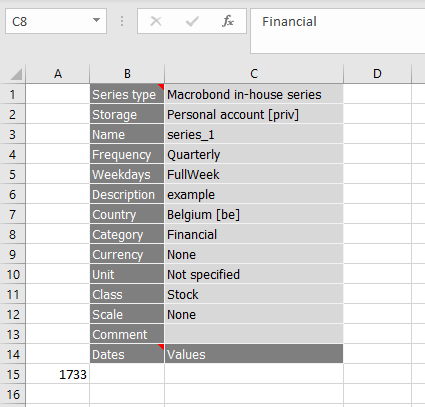
Type in the CONCATENATE formula. Compose the date according to your regional settings, i.e.,
=CONCATENATE(Excel_cell_with_year, "-01-01")
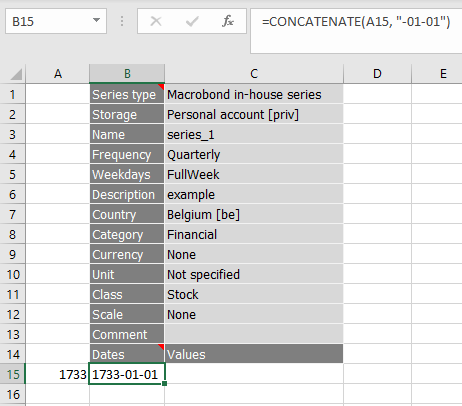
Paste in the values in the next column. The rest of the dates will be filled in according to template’s frequency.
Why do I see [something] in a template?
In Macrobond 1.26 we have decided to change a bit parameters formatting. If your in-house was created on version before Macrobond 1.26 it doesn't have [something] in template but it will work too. Newly created in-houses incorporate this from the start.
Why do I see ‘Region mismatch’?
In Macrobond 1.26 we have decided to change a bit parameters formatting. Macrobond recognizes when it encounters older version of in-house template. You can choose to:
- Update template and upload – this will add [something] to template.Note that when updating the program will ask separately about fixing each of the fields.
- Upload – it will keep the in-house in older format. Users with all active versions will be able to upload it.